Sunday, August 3, 2008

Split Rimmed Pots


I was inspired recently after watching a 'how-to' video on how to make a vase with a split rim. I decided to do it as a class demonstration and the results were impressive. I don't have pictures of the actual process, but here are pictures of the finished vases. The trick when your making these is to leave extra clay at the rim. Also, when you make the grooves in the rim before you pinch the clay together, use a pencil point. It makes the perfect spacing between the grooves. I'd love to work on this technique and do something really unique with it. I have a few ideas and maybe I'll post something one day.....

Sunday, July 13, 2008

Clay Trays!!!


Inspired by some wonderful Japanese ceramic trays I had seen years ago, I decided to make these sweet serving trays as a class demonstration last week. I began by rolling out slabs and extruding a variety of coils. I textured the slabs with some stamps I had made and then cut out the various shapes I wanted the trays to be. I added the extruded coils to the perimeter of the slabs to create the edges of each tray. One trick I showed my students was how to cut a round coil in half by placing two strips of wood half the thickness of the coil on either side of the coil and then resting a wire cutter on the wood and cutting through the coil lengthwise (see picture). This will give you a half-round coil which can be used for an interesting edge. On one of the trays I curled a flat extrusion to create handles, scoring them onto each side of the tray. By weeks end, I completed a variety of trays and now I'm thinking of making sets that fit in one another...you may see those pear shaped trays in sets of 2 or 3!!

Again thanks to Norma for taking great pics of each step!

Wednesday, July 9, 2008

Juicer Demo


The first week back to class for the summer session and I began with a demonstration on how to make a juicer. What I really like about this design is that it has a catch bowl to collect the juice, a built in strainer, and a spout for pouring. I've seen them before, but I've never attempted one like this so I just had to do it!
First, I threw the juicer part which is hollow and made sure I made a little reservoir for the juice and seeds to collect. I measured carefully with my calipers the diameter of the lip of the juicer top. I then threw the bowl shape with a 'gallery' to hold the juicer making sure the measurement was accurate for a tight fit. I finished it off by trimming the underside of the juicer part when it was leather hard, carving the grooves in the dome shape, and drilling holes in the bottom curve to enable the juice to drain out and hopefully leave the seeds behind! I added a handle and spout to the bowl. Both the spout and handle were made from slabs and scored and attached in place. A section from the side of the bowl was cut out to enable the juice to pour from the bowl. Here are the step by step pictures. Will be using this in a few months when there are lemons galore!! A huge thank you to Norma for taking some great pictures!

Sunday, June 29, 2008

Wedding Fever


Well, I'm going to apologize to my students right now for not being in my right mind for the next month and a half. My son and fiance are getting married on August 16 and we are in the midst of the preparations. I have offered my pottery skills to help defray the expenses that keep adding up and am glad to do so. So far, I've made the wedding keepsake momentos (140 in all) that guests will be taking with them. They are porcelain hearts that will be attached to a pretty paper with a verse written on it. I've also made mugs for the attendants. The bridesmaids are getting personalized coffee cups with their first names imprinted on them. The groomsmen will have their initials stamped on their coffee cups in a more masculine style. I'm also making all of the flower pots for the reception tables - 12 in all. I have only 3 finished and plan on getting those done within the next week. Here are pics of the things I've finished. Not pictured yet are the flower pots I made for all of the reception tables. I'll add those after the wedding. Students, if I seem a little preoccupied, bear with me..it's only temporary! :)

Friday, June 27, 2008

Pottery Class Pizza Party!!


We had such fun at our last Thursday morning class of the Spring session. We were all invited up to Jennaro's house for fabulous homemade (from scratch) pizza! He stayed home that morning to prepare for us and when we all arrived the dough was sitting there patiently awaiting our eager hands. He had prepared all the toppings and all we had to do was put them together and hand them off to him. He popped them in the oven and out came the most delicious pizza I've had in years! A wonderfully fun time was had by all and I so appreciate Jennaro and Bobbie's hospitality and for opening up their home to us mudders!! Here are some pictures to enjoy thanks to Doris!

Thursday, June 5, 2008

Before and After


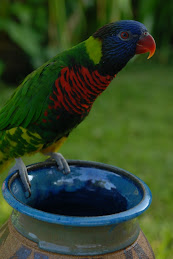
Off to Florida in a few days, but I wanted to share the results of my paper resist technique. To glaze these pieces, I covered the outside with a thin layer of transparent glaze, just enough to give the surface a nice sheen but still allow the stain and texture to be seen clearly. The inside of these pots were glazed with Flambe blue and the rims dipped in Castille blue, a very nice contrast I thought. Holly's lorikeet, Missy, posed with these finished pots! I thought the color on the rims almost matched the blue in Missy's feathers!